Autolab Home Lab Build
Recently I have been doing a lot of upgrading from 5.0 to 5.1 testing in my home lab. There were also quite a few (beta) things I had started and just never got around to finishing. My lab was pretty much a mess, a functional mess, but a mess all the same. So this weekend I decided to nuke it from orbit and rebuild.
I run my home lab inside VMware Workstation 8 on a ASUS desktop running Windows 7 Home Professional 64bit, with 16 GB RAM, and a few 60 GB SSDs. The lab actually runs pretty well on this setup. In the past the lab has been two ESXi servers, the vCenter virtual appliance, and an OpenFiler VM for IP storage. No DNS, AD, or other extra services, because of this some of my lab projects are somewhat limited. For this rebuild I decided to use Autolab 1.0 – http://www.labguides.com/autolab/.
Autolab is a set VM shells and pre-configure open source VMs that provides a complete VMware lab environment including two ESXi hosts, a Windows vCenter Server, IP Storage (both NFS and SCSI), Active Directory, DNS, TFTP services, and more. Most of the software installations have been automated making it very easy to deploy (or redeploy) your lab environment as needed. This lab environment is very well suited for VCAP5-DCA study.
Since much of the software used cannot be distributed with Autolab (all the VMware and Microsoft stuff) it does take awhile to locate and download all the software necessary. Once you have software and have it placed in build share on the AutoLab FreeNAS VM deploying the lab environment is fairly quick and painless.
Autolab does a really nice job of deploying and then configuring the Windows machines necessary for the lab. The DC VM installation took about 35 minutes in my environment. During this time AD and DNS are set up, a PXE boot server is installed and configures, SQL Express is installed, and the databases for vCenter, VUM, and View are created.

There is a nice validation script that can be run once the DC build is finished to make sure things look good and that all the required software for future automation scripts/builds is in the right places.
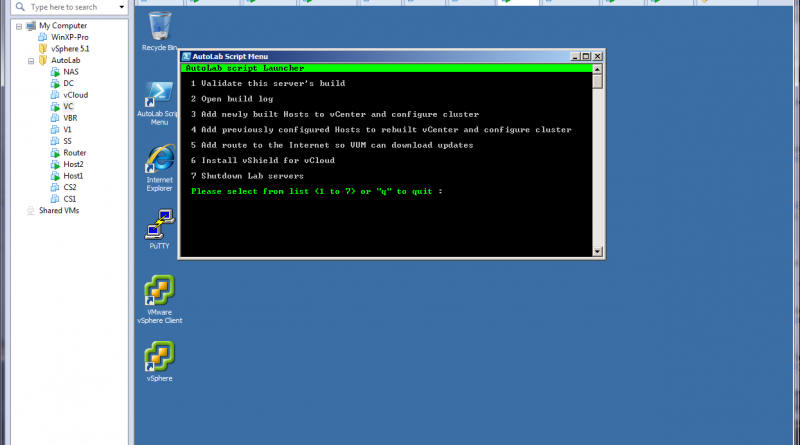
Once the DC VM has been deployed the next step is to deploy the vCenter VM. Again this has been nicely automated. Once Windows Server 2008 R2 has been installed vCenter is installed along with VUM, PowerCLI, vCLI, and the vSphere Client. This process took about 35-40 minutes in my environment.

The VC VM has a menu script that contains another Validation, just to check that the environment is good for you to move forward.
The Windows server builds (for both the DC and vCenter) are tedious tasks. This is one of the reasons I did not have them in set up in my lab previously. The Autolab does a very nice job automating the Windows installs. Just kick off the installation and go do something else for a bit, when you come back run the validation script and all should be well. For some more information on the Windows Builds in Autolab check out this post – http://professionalvmware.com/2012/06/autolab-automation-uncovered-windows-builds/
The Autolab 1.0 Deployment Guide is a great reference with all the networking, usernames, and passwords well documented. All the automation scripts are also easy to find. So when automation does go wrong it is easy to figure out what happened, how to fix it, or how to work around it.
I had some trouble with the PowerCLI scripts used to create datacenter, the cluster, and add the new hosts to it but I was able to walk through the scripts and configure this stuff manually. I think this might be due to the fact that I am using PowerCLI 5.1 and vSphere vCLI 5.1. Would be nice to get the automation working but I will mess around with that later.

After just a couple hours my home lab was rebuilt and ready to rock.

Waiting for CentOS and vCloud Director to install now. Fun stuff! 🙂


")
Hello! Just a quick note about a new free backup solution that you may find helpful for your home lab – Unitrends Enterprise Backup. Unitrends recently released a Free Edition of their backup and recovery software (which is deployed as a Hyper-v or VMware virtual appliance).
It protects up to 4 VMs, free forever (and if a user is Microsoft or VMware certified they can get an even more robust not for resale license).
A few notable features of the Free Edition…
– Instant recovery of virtual machines.
– File-level recovery of files and folders.
– Rotational archiving to disk, tape, NAS and SAN.
– Automated backup scheduling with flexible strategies.
The Free Edition can be downloaded here:
http://www.unitrends.com/unitrends-enterprise-backup/download